Orbry Insulation Boards
Orbry Insulation boards

BENEFITS OF ORBRY INSULATION BOARDS

SOLID BED FIXING
DOT AND DAB FIXING
STUD WALL FIXING

SOLID BED FIXING

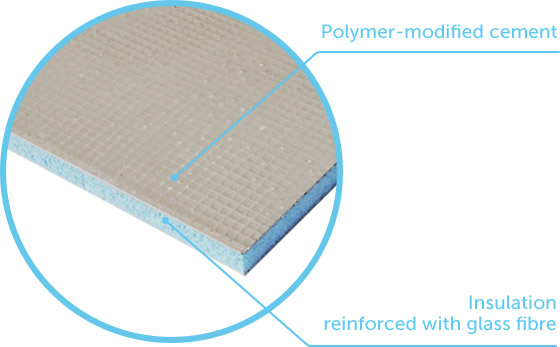
This method is suitable when the walls are flat and true. 

Spread a rapid setting, flexible, cement-based C2 category tile adhesive evenly onto the wall. Put the board on the wall and press firmly into position before adjusting with a spirit level to ensure that it’s flat and level. Try to avoid having any air gaps between the Orbry Board and the wall to eliminate the chance of interstitial condensation. Need Help feel free to contact us Here or pop in and see one of our specialists

DOT AND DAB FIXING

This method is ideal when the walls are uneven.

First, use a masonry drill at approximately 600mm centres. Then, apply dabs of adhesive to the back of the board where the drill holes are located. The thickness of the adhesive shouldn’t exceed 30mm and the dabs should be a minimum diameter of 120mm. Put the board up to the wall and press firmly into position before adjusting with a level to ensure it’s both flat and level. Allow the adhesive to dry and then drill through the existing holes to the depth of the Orbry Spanker Dowel. Insert the dowel / fixing pin and hammer into place. The Orbry Spanker Dowel must penetrate the weight-bearing surface by a minimum of 35mm.

STUD WALL FIXING

Fix vertical studs at 600mm centres. All board edges must be supported with noggins. Fix the boards with Orbry Stainless Steel Screws.

50mm ORBRY BOARDS USED AS INSULATION LAYER WITH UNINSULATED SCREED

For information on how Orbry Boards can be installed on top of uninsulated screeds, please read our recent case study. The boards are the perfect solution for helping heat stay trapped within an otherwise cold floor (like in kitchens or conservatories).